


A nightstand is a versatile furniture piece that you can use for various purposes. Before starting the building process, you need to find a style that suits you. There are many styles of nightstands available, so look for one that fits with your décor. Consider choosing a style that matches other furniture items in the space as well.
Before starting the building process
You should only use the instructions in our guide as guidelines. We'll be building a modern rustic nightstand with a drawer. It's one that we found suitable for the average home. However, it may not be ideal for your home, so make adjustments accordingly. It's always more fun being able to customize your own DIY project anyways!
Just to make it clear: whenever we provide you with measurements, tools, or materials, you're free to use the same ones or your own. We encourage you to get creative to build a nightstand you can be proud of.
We understand that every project will be different, and because of that, you'll want to read all the steps before starting your design. Remember, you should always make changes according to your needs, whether it's adding additional components or changing dimensions.
Taking proper measurements and preparation
When building a DIY nightstand, it's critical to choose the correct dimensions. Measure the space where your nightstand will go to ensure it fits perfectly. This is especially important for those who plan on placing their nightstand in a tight area.
Here are the measurements of the nightstand we're creating:
Height: 26 1/4 inches tall
Width: 20 inches
Depth: 16 inches
Gather the necessary tools and materials
Please note that the tools required will depend on whether you're building your nightstand using plywood or other types of wood. It's a good idea to go through the guide first before deciding on a method that suits you better. If you're building with plywood, you'll need a circular saw. If not, any saw or drill will work.
A great saw to consider is the SuperSaw. You get all the tree chopping power of a gas chainsaw but without the cost, bulky size or maintenance. It's an upgraded version of the chainsaw--easier to handle, lightweight, and compact.
Here are the tools and materials you'll need.
- Four 2 inch ×2 inch x 8 ft
- One 1 inch × 6 inch x 6 ft
- One 1 inch × 4 inch x 6 ft
- One 1/2 inch x 2 inch x 3 ft board or 1/2″ plywood
- One 2 ft x 2 ft plywood x 1/4 inch thick
- One 3/4 inch x 16 inch x 48 inch edge-glued panel board
- 12 inch drawer slide packs
- 3/4 inch and 1 inch wood screws
- One 1/4 inch brad nails
- One 1/4 inch and two 1/2 inch Kreg screws
- 1/4 inch wood shims or paint sticks
- Cabinet knobs
- Wood stain
- Kreg pocket hole jig
- Miter saw
- Circular or table saw
- Straight edge guide
- Wood glue
- Drill
- Brad nailer
- Clamps
- Speed square
- Level and mini level
- Tape measurer
- Pencil

As you're gathering the tools and materials, ensure they're the correct measurements. Sometimes, lumber may end up being too long, thick, or thin. So, you'll want to double-check everything.
We understand that not everyone creates DIY projects, so you might not have any saws and other tools handy. If this is the case, check your contacts to see if you can borrow someone else's. You can also find a workshop that will let you use their equipment. If you're taking this route, make sure you bring all your pieces of wood with you so you don't have to make multiple trips.
However, if you plan on working on more DIY projects in the future, consider purchasing your own equipment. If you have the tools handy, you'll be more inclined to start new projects.
Step 1: Make your board cuts
Once you have access to a miter saw or jigsaw, make the following cuts from the 2 inch x 2 inch x 8 ft boards:
- Four 2'' x 2'' x 25 1/2'' for the legs
- Six 2'' x 2'' x 13'' for the sides
- Six 2'' x 2'' x 17'' for the front and back
Make the following cuts from the 1 inch x 6 inch x 6 ft board:
- Two 1'' x 6'' x 13'' for the sides
- One 1'' x 6'' x 17'' for the back
Now, make the following cuts from the 1/2 inch x 2 inch x 3 ft board:
- Two 1/2'' x 2'' x 13'' for the drawer slide
Then, make the following cuts from the 1'' x 4'' x 6 ft board:
- Two 1'' x 4'' x 14'' for the drawer box
- Two 1'' x 4'' x 11'' also for the drawer box
Lastly, make the following cut from the 3/4 inch x 16 inch x 48 inch panel board:
- One 3/4'' x 16'' x 20'' for the top
To be safe, remeasure all the cuts you made to ensure they're the correct measurements.
Step 2: Adding pocket holes to your boards
To add pocket holes to your boards:
Set up your Kreg pocket hole jig and set it to the thickness of your boards. Here's a lumber size guide you can reference.
Ensure you tightly secured the Kreg jig and then add two pocket holes on each side of your 2'' x 2'' boards that will be used for the sides, back, and front. Do not add holes for the 2x2 leg boards.
Grab two of the 2'' x 2'' x 17'' boards and add two more pocket holes on another side. You should be setting your Kreg jig for 3/4'' wood here.
Add two pocket holes to all your 1'' x 6'' boards that you'll use for the sides and back of the nightstand.

Step 3: Piecing together the side frames
We can finally start doing some assembly! As you're working on the following, always make sure that all pocket holes are facing you.
- Grab two of your 2'' x 2'' x 25 1/2'' boards and one 2'' x 2'' x 13'' board.
- Drill two pocket holes in the 2'' x 2'' x 13'' board so you can piece together the side frames with Kreg screws. Keep the sides pushed in using a clamp or your hands, so the screws go in properly.

- Lay 1/4 inch wood shims or two stacked paint sticks in the two connected corners. Then place one 1'' x 6'' x 13'' board on top. Press the board down until it fits firmly.
- Screw in all pockets holes of the 1'' x 6'' x 13'' board.
- Remove the wood shims or paint sticks.

- Add one 2'' x 2'' x 13'' underneath the 1'' x 6'' board and screw it in.
- Using your tape measurer, add a pencil mark that's 3 1/2'' up from the bottom of the legs.
- Add another 2'' x 2'' x 13'' board above the pencil mark and drill it in. You may need to use a clamp to keep the legs pushed in.


Awesome work! You now have one side of your soon-to-be beautiful nightstand. Repeat step three of this guide entirely to create the other side of your nightstand. Then, move on to step four.
Step 4: Piecing the back and sides together
Follow these steps to assemble the back and two side frames:
- Lay both side frames upwards, so their pocket holes are facing each other.
- Attach one of the 2'' x 2'' x 17'' boards with four holes to connect the side frames. Ensure the two holes along the edge are facing inwards.
- Screw in the middle pocket holes.

- Lay 1/4 inch wood shims or two stacked paint sticks in the two connected corners. Then place the one 1'' x 6'' x 17'' board on top. Press the board down until it fits firmly.
- Screw in all the pockets holes of the 1'' x 6'' x 17'' board. You may need to use a clamp here.
- Remove the wood shims or paint sticks.

- Attach another 2'' x 2'' x 17'' board underneath the 1'' x 6'' x 17'' board.
- Screw the board in.
- Place another 2'' x 2'' x 17'' board to connect the bottom of the nightstand--3 1/2'' up from the bottom legs.
- Screw in the board.

Step 5: Piecing the front with the sides
It's time to start working on the front of the nightstand. Follow these steps:
- Flip the nightstand over, so the backside is now in the air.

- Add the other 2'' x 2'' x 17'' board with four pocket holes to connect the side frames. Ensure the two holes along the edge are facing inwards.
- Screw in the middle pocket holes and use a clamp if necessary.

- Place another 2'' x 2'' x 17'' board to connect the bottom of the nightstand--3 1/2'' up from the bottom legs.
- Screw in the board.
Sit the nightstand upright to see if your nightstand looks like ours so far. If you're tired, take a few minutes to relax and grab a drink of water.

When you're ready, keep on going!
Step 6: Preparing for the drawer box
Installing the drawer box will be different for some of you. It all depends on the drawer slides you're using. Follow the instructions included with your drawer slides to install it.
If you're using a different set of slides as us, feel free to skip this step. If you're using the same 12 inch slides, keep following along.
- Lay your nightstand down, so you can start working on the inside of one of your side frames.

- Add one 1/2'' x 2'' x 13'' piece of plywood or wood board to the inside edge.
- Countersink the screws underneath the wood surface and screw them in using 1'' wood screws.

- Draw a line at 3/4'' and 1/16'' from the front edge of the legs on both sides.

- Create another pencil mark 3/4'' up from the plywood or wooden board you drilled earlier.
- Use a level to continue drawing the line to the end of the board.

- Place the correct drawer slide so that all the holes are on the drawn line and that the front of the slide doesn't pass the initial line you drew.
- Use a mini level to ensure the slide is leveled.
- Drill pilot holes in the front and last holes.
- Use the included screws that came with the drawer slides.

Repeat this entire step with the other drawer slide on the other side. Only then should you start installing the drawer box.
Step 7: Installing the drawer box
The last component you need to assemble is the drawer box. But don't worry, it's pretty straightforward--follow these steps:
- Use a circular or table saw and straight edge guide to cut your 2' x 2' x 1/4'' thick plywood to 16'' in width by 11 3/4'' long.

- Grab both your 1'' x 4'' x 14'' boards and add pocket holes on both sides.
- Below should be all the boards you have for the drawer box.

- Lay one of your 1'' x 4'' x 11'' boards down and set one 1'' x 4'' x 14'' board in place to screw the boards together using Kreg screws.
- Screw together the two pieces and repeat with the other 1'' x 4'' boards until the drawer box is assembled.


- Place the plywood board on top of the drawer box and drill it in using 1 inch wood screws. Make sure to add pilot holes beforehand.

- Add the drawer slides to the sides of your drawer box. Drill pilot holes and use the screws that came with the slides. Use a clamp if necessary.

Put your drawer box in your nightstand and give yourself a round of applause.

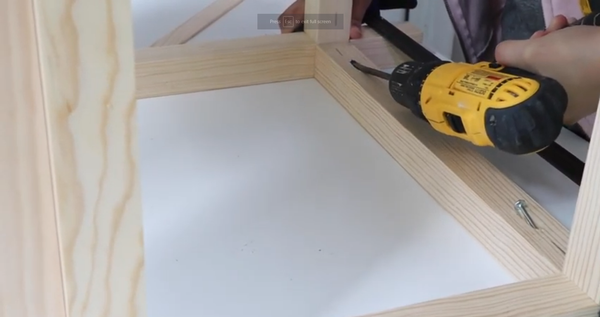
- Install the last 2'' x 2'' x 17'' to the front of the nightstand.
- Ensure that everything is aligned.

Step 8: Piecing the drawer face to the box
Follow these steps to complete the drawer box:
- Measure the length and width of where the drawer face will fit. The drawer face will be a 1/4'' less than these measurements to ensure it fits well.

- Cut the remainder of the 1'' x 6'' x 6' board using your miter saw for the long side of the drawer face.
- Cut the width side of the drawer face using your circular or table saw and straight-edge guide.
- Assemble the drawer face to your drawer box using wood glue and one 1/4'' brad nail in the front. Nail in the drawer face from the back with more Kreg screws, so they're hidden. You can use popsicle sticks to hold your drawer face in place.


Step 9: Piecing together the bottom and top
Let's start with the bottom, simply:
- Measure the length and width of where the shelf will go. If you've been following along correctly, the measurements should be around 13 inches x 17 inches.

- Cut your 3/4'' panel board to the measured size.
- Add four pocket holes on the bottom side of the panel board and screw it in using Kreg screws.

- Cut another piece from your 3/4'' panel board to a 16'' x 20'' board.
- Place it on top of your nightstand to ensure it aligns perfectly.
- Add some wood glue around the edges and realign the panel board.
- From the inside, screw in one 1/4'' Kreg screw.

Step 10: Staining your nightstand and adding a knob
You're all finished with the construction and assembly parts. All that's left to do is add a knob to the nightstand and stain the outside.
Staining will give your nightstand a beautiful finish. Feel free to use any knob and wood stain you like. Follow the instructions on the label of the stain you're using for the best results.
Once you're done with that, here's what your DIY masterpiece should look like!

We hope you had a lot of fun building your own DIY nightstand. We're sure you brought your creativity along to put together a stunning piece. We wish you luck with all your future projects!
SuperBrandTools?
Off Your First Order


